
Eliminate vapour lock
Vapour Lock could be the cause of your Sprite’s coughs and splutters. Check out how I installed a Facet electric fuel pump which helps to eliminate vapour lock and improve reliability. This post may contain affiliate links or sponsored content. See my Disclosure Policy for more details.
A Little History
When the Austin Healey Frogeye Sprite came to market in 1958, its 42.5 bhp A-Series engine drank its fuel via twin SU carburettors that were supplied by a low pressure, mechanical fuel pump. This pump was mounted on the engine block just below the exhaust manifold.
The Problem – Vapour Lock
The location of the pump in a very hot environment can cause the fuel to vaporise in the pump which stops the pump from pumping and very quickly starves the carburettor float chambers of fuel … no fuel; no go.
This vapour lock, at best, causes the engine to splutter and lose power; at worst, it causes the engine to stall. You will then struggle to restart the engine again until the whole setup has cooled down sufficiently.
The Solution – Electric Fuel Pump
It wasn’t until 1964, with the introduction of the Sprite MkIII and MG Midget MKII that BMC addressed the issue by siting an electric SU fuel pump at the back, right-hand side of the car, near to the fuel tank.
This is a common retrofit solution for older cars that suffer with vapour lock because of mechanical pumps. In place of the SU pump, the Facet solid state pump is an excellent, reliable and very affordable product.
My Car Situation
When I bought my Frogeye, the previous owner had fitted a Facet pump so vapour lock was not actually a problem! In truth though, they had made a real bodge job of the installation. They had fitted the pump high in the engine bay which caused it to click furiously the whole time as it struggled to lift fuel 60cm vertically from a fuel tank that was situated 2m away at the back of the car. As well as being incorrectly sited, they had wired the pump directly from the battery terminals to a switch underneath the dashboard without even an inline fuse.
I decided that the only course of action was to install the pump in the correct location (close to the fuel tank and as low as safely possible) and wire it into its own fused circuit which is activated when I switch the ignition on.
Installation
Please read the disclaimer below
The information contained herein is not meant to be comprehensive and is for informational and entertainment purposes only. You should not undertake to perform anything described herein without adequate training and/or supervision. The author disclaims any responsibility for any injury, damage, or loss as a result of reliance upon the information found on this site/blog.
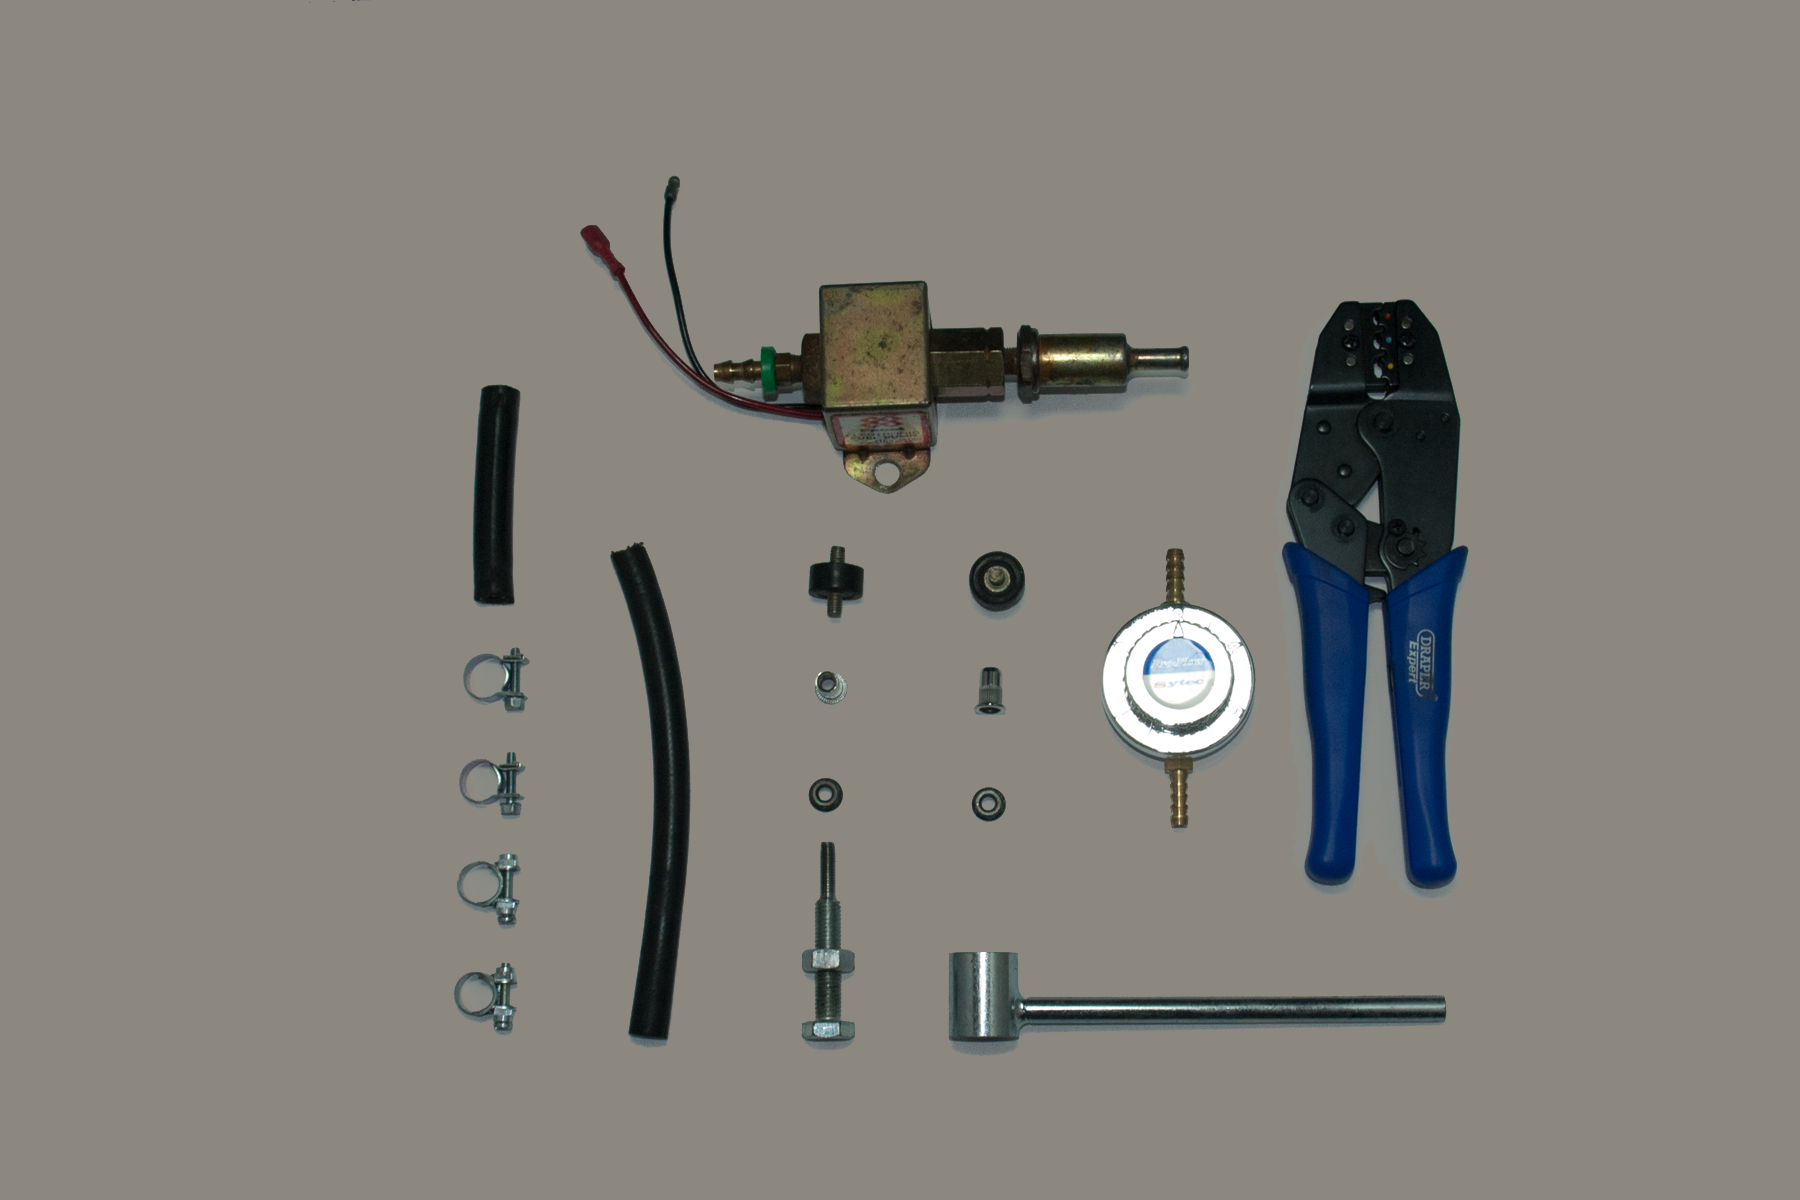
Parts Required
Facet pump with Purolator filter
rubber isolating mounts – these prevent fuel from frothing in the pump and also reduce the noise from the pump being transmitted into the car
Sytec Pro Flow Fuel Pressure Regulator
fuel hose and clips
6mm stainless steel rivnuts (you will need a rivnut setting tool –)
blanking plate and gasket for engine block for removal of the original mechanical pump
Mounting The Fuel Pump
Before starting, I drained the petrol tank. The last thing I wanted was to get soaked in petrol or flood my work area with petrol. I did this in a well-ventilated environment i.e. outside, as the build up of petrol fumes is explosive and could cause severe injury or death. and I wasn’t comfortable with either of those outcomes.
Location
The first thing to do was to establish a suitable location to mount the pump. Fortunately, Sprites and Midgets have a very handy rear bulkhead close to the fuel tank. I chose to mount my fuel pump to the right of the transmission tunnel with the inlet below the outlet and the whole pump oriented at a 45 degree angle to vertical. Apparently, this orientation allows any vapour / bubbles to pass through the pump without causing vapour lock; the very problem that I was trying to solve . I spent a little time getting the position just right so as to avoid my fuel pipe fouling on the shock absorber lever arm. I also checked that the fuel hoses could bend enough to connect to the existing pipework without kinking.
Fitting
Having marked the position of the pump through the holes of the mounting bracket, I drilled the bulkhead to accept the rivnuts. If you are going to use this area to earth the pump (remember, Frogeye sprites are positive earth – unless it has been converted (LINK)) clean it back to bare metal at this stage.
Screw the rubber isolating mounts into the rivnuts and mount the fuel pump.
Connection
Right, you now need to cut through the existing petrol pipe. If the pipe is original, it will be kunifer (a copper nickel alloy), although it may have been replaced with copper pipe over the years. I used a plumber’s pipe cutter rather than a hacksaw because there is potential for a hacksaw to create a spark and I didn’t want sparks around petrol. just in case of fuel spillage, I positioned an oil draining can (LINK) below the pipe.
I cut lengths of fuel hose to fit, taking care to ensure that the hose did not kink or foul any moving parts. You can see from my photograph that I needed to clip the inlet pipe to the rear bulkhead to hold it in place and prevent it from fouling moving parts.
At this stage, it seemed sensible to take a breather, have a cup of tea and prepare to connect everything else up !
Connecting To The Carburettor
I next turned my attention to the engine bay. This should be quite straight forward as there is no drilling required.
If you are carrying out this project on your own car with a mechanical fuel pump, you will need to remove the existing mechanical fuel pump by disconnecting the fuel hoses and unbolting it from the engine block. Be careful of fuel spillages. You will then need to fit a blanking plate and gasket in place of the pump.
Install Sytec fuel pressure regulator using the existing fuel hose from the petrol tank and to the carburettor float chambers. A convenient location for this is above the left-hand footwell. I set the regulator to the correct setting, 3 psi, by turning the adjustment knob to the 3rd click. With that, the tank to carburettor fuel connections were complete.
Another breather and another cup of tea ?

Electrical Connections
My car is still wired as positive earth but some people choose to rewire for negative earth. Here is a great set of instructions if you would like to rewire your car for negative earth.
I had already decided to add a new fuse box to my Frogeye Sprite (see Fuses and Frogeyes) so that I could add future ancillaries (such as an electric fuel pump!) without overloading the existing fuses with yet another ancillary e.g. radio, spot lamps, sat nav.
I ran a white wire (this is inline with what BMC did when they started fitting electric fuel pumps to Spridgets) from the fuse box, with the existing wiring harness, to the fuel pump
Positive Earth
For positive earth cars, connect the pump’s RED wire to EARTH (positive) and the BLACK wire to POWER (negative). It is essential that the body of the pump is earthed.
Negative Earth
For information, negative earth cars are connected with the RED wire to POWER (positive) and the BLACK wire to EARTH (negative).
Commissioning
Once I had finished all of the fittings, fuel connections and electrical connections, I began commissioning the new pump.
Firstly, I went over all of the connections again to ensure that they were tight, dry and that I wouldn’t have petrol leaking everywhere.
I then put a couple of gallons of fuel into the petrol tank; just enough to carry out the commissioning without overfilling (in case I needed to drain the tank for some reason).
Next, to prime the pump, I disconnected the outlet hose from the fuel line next to the transmission tunnel and put the end of the hose into a fuel can.
At this point, I employed the services of my glamorous assistant for switching the ignition on and off.
Drum roll, please ! My glamorous assistant turned on the ignition. The pump came to life and about 10 seconds later fuel started to pump into the fuel can. Switch off the ignition. Success … but not yet time for a celebratory cup of tea !
I reconnected the hose to the fuel line, checked it was secure and then I moved to the engine bay.
This time, I disconnected the fuel hose from the carburettor float chamber and placed the hose into the fuel can.
My glamorous assistant switched on the ignition and I waited for the fuel to appear at the hose end … which it did.
With the ignition switched off, I reconnected the hose back to the float chamber.
Now, the final and exciting part. I tried to start the car. It took a couple of attempts but it started and ran fine from that point.
Enjoy a celebratory cup of tea !
Summary
If vapour lock is an issue for your Sprite or Midget (or any car with a mechanical fuel pump for that matter), consider fitting an electric fuel pump. It is an affordable, period upgrade that will improve the reliability of your car and further enhance the joy of owning a British classic.